Direct answer
ClipShip handles the repetitive clipping work, then leaves the final choice to you.
Import a long spoken video, tell ClipShip what kind of moments you want, let the AI propose clips, then review the framing, words, headline, and export before anything is published.
Watch the full walkthrough
See the complete workflow, from importing a long video to reviewing and exporting the generated clips.
1. Import the source video
Choose a video on your computer or paste a supported YouTube video, YouTube Short, Twitch VOD, Twitch clip, or Kick clip link. Unsupported websites, live streams, and channel pages are rejected before processing starts.
2. Tell the AI what kind of clips to find
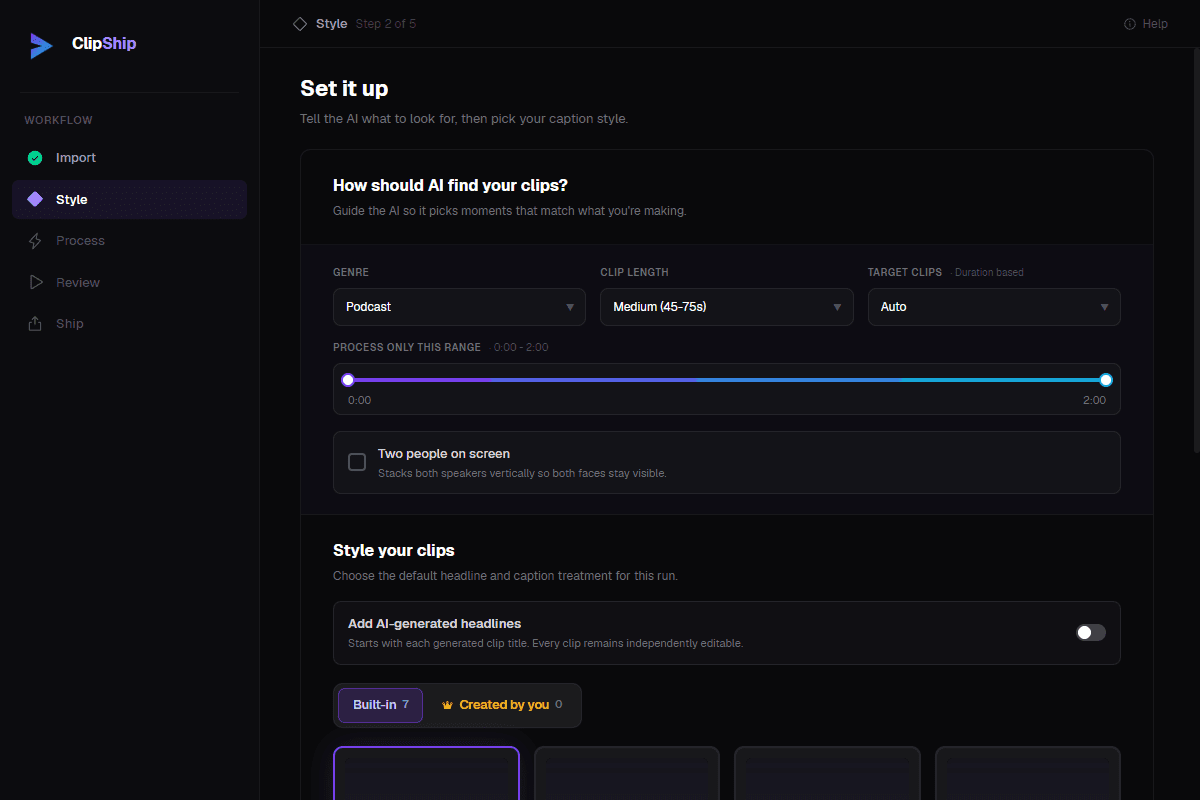
Choose the content genre, preferred clip length, target number of clips, and caption style. You can also limit processing to part of a long recording and enable AI-generated on-video headlines.
3. Let ClipShip process the video
ClipShip creates a timed transcript, looks for standalone moments, reframes the selected speaker for vertical video, and prepares word-level captions. In Local AI mode this work stays on the device. In optional API mode, the video stays local but transcript text is sent directly to the selected provider.
4. Review the generated clips
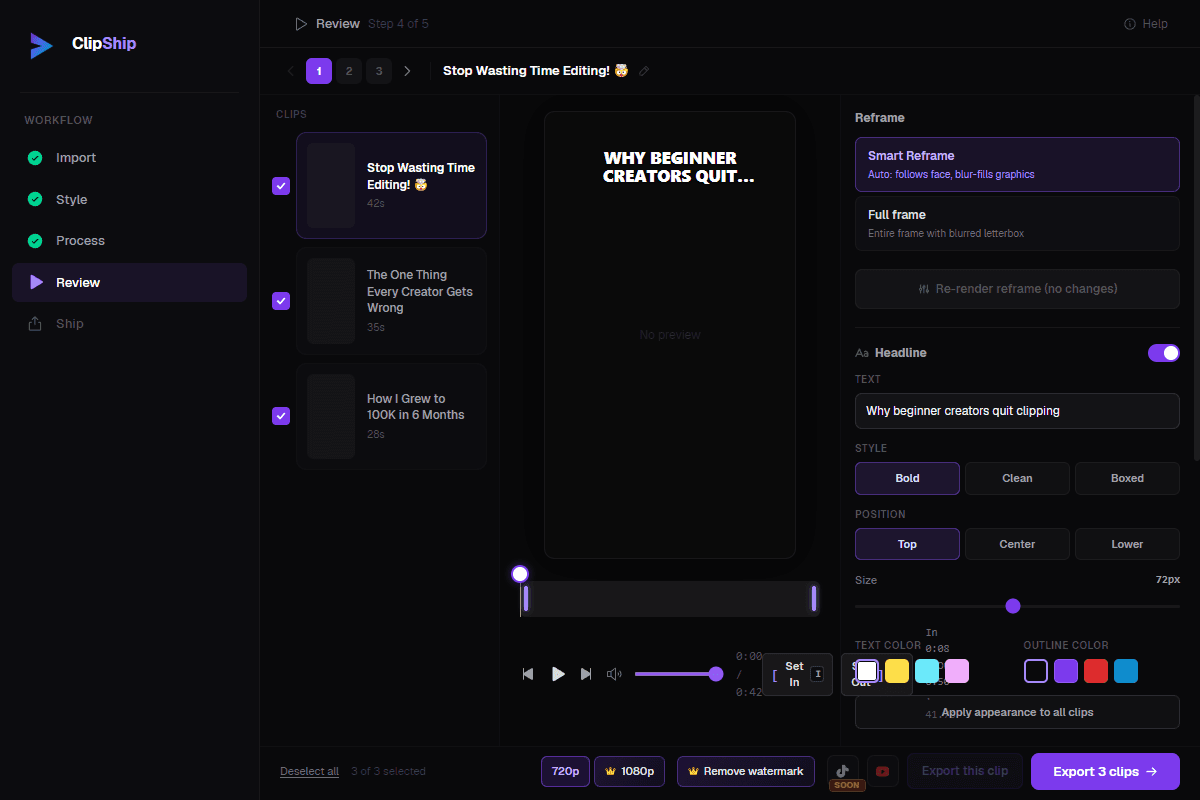
The review screen is where you make the output yours. Play each clip, move the in and out points, choose Smart Reframe or Full frame, edit caption words, and turn the optional on-video headline on or off.
What do the review controls change?
| Control | What it changes | Important detail |
|---|---|---|
| Set In / Set Out | Moves the beginning or end of the active clip to the current playhead position. | It changes only that clip. Preview the new boundaries before exporting. |
| Smart Reframe | Follows a clearly detected speaker while creating a vertical clip. Graphics or sections without a reliable face use a blurred full-frame background. | After changing the reframe mode, use the re-render button to rebuild that clip's video. |
| Full frame | Keeps the entire source frame visible and fills the unused vertical space with a blurred background. | Use it when automatic face framing removes something important from the original shot. |
| Apply appearance to all clips | Copies the active headline's style, position, size, text color, and outline or box color across the batch. | It does not copy the headline wording or turn headlines on or off for other clips. |
What do headline, spoken opening, post caption, and captions mean?
| Label | What it means | Where viewers see it |
|---|---|---|
| Headline | A short title for the clip. You can edit its text, style, position, size, and colors. | Rendered on the video when the headline toggle is enabled. |
| Spoken opening | The first short sentence already spoken at the beginning of the selected clip. | In the clip audio. ClipShip shows it as context and does not replace the speaker's words. |
| Post caption | A suggested sentence or two to accompany the clip when you publish it. | In the social post description, not burned into the video. |
| Word-level captions | The timed subtitles created from the transcript. Each word can be corrected in review. | Rendered into the exported video using the selected caption style. |
What does “Generate 3 options” do?
It creates three alternative packaging ideas for the current clip: direct, curiosity, and bold. Each option contains a replacement headline and post caption. It does not alter the spoken opening or the clip boundaries, and nothing changes until you choose an option.
5. Export or post the finished clips
Choose 720p or 1080p, then export the active clip or select several clips for batch export. ClipShip renders your trim, reframing, on-video headline, and caption choices into the files saved on your computer. The progress window shows which clip and render stage is currently running.
A connected YouTube account can receive the active clip directly from the review screen. ClipShip must render the finished video before uploading it, so direct posting includes both render time and upload time. Exporting locally stops after the render, which is why it usually finishes sooner.
Related ClipShip guides
Keep exploring the local clip workflow
ClipShip for macOS
Download the public Apple Silicon build and review its requirements, local AI architecture, installation, and privacy boundary.
Best local OpusClip alternatives in 2026
A source-checked comparison of five desktop AI clipping tools by platform, privacy boundary, pricing, and workflow.
No-upload OpusClip alternative
The main comparison page for creators who want OpusClip-style clipping without uploading private footage.
Local AI video clipper for Windows
A focused explanation of ClipShip's local Windows workflow and when local AI clipping is the right fit.
OpusClip alternative with a free no-watermark trial
An honest breakdown of ClipShip's 7-day Pro trial, forever-free tier, watermark, and export limits.
Podcast to Shorts AI for Windows
A practical workflow for turning long podcasts, interviews, and webinars into vertical clips with local AI.
YouTube to Shorts clip maker
A practical page for turning YouTube and talking-head videos into vertical clips.
Twitch VOD to Shorts clip maker
Import a Twitch VOD or clip, find spoken highlights locally, and export vertical clips on Windows.
Affordable OpusClip alternative for beginners
A pricing-focused guide to ClipShip's free tier, $5 founding plan, and $99 lifetime option.
ClipShip vs OpusClip
The full side-by-side comparison between ClipShip and the best-known cloud clip generator.